
Even though there is no implemention of Mapsui in Xamarin.Forms you can use it. This is also possible with little effort and good performance. But what is Mapsui? Mapsui is an open source project lead by Paul den Dulk. It is available via NuGet and Github. Up to now the project supports WPF as well as Xamarin Nativ Android, iOS and UWP. It allows you to use OpenStreetMap or your own map data both online and offline. The map data is usually in the *.mbtiles format. Furthermore, you can place markers, labels and other shapes on the map. The performance is pretty good. In my first project with this library I could place over 1500 markers on a 300 MB large map without any noticeable performance issues.
The usage of the library itself is pretty simple and you can get some samples for Mapsui on Github. The WPF application shows every aspect of the library at once. The native Xamarin apps load only one aspect, which can be set in the sample code. For example you can switch from your custom map data to OpenStreetMap and so on.
To see this post in german click here: Diesen Post in  Deutsch anzeigen

Preparations
In order to use the Mapsui library, it has to be referenced. I’d recommend using NuGet, however, it is also possible to use the project directly from the Github repository. If not already done, a new project has to be created. Due to the fact, that this post is about Xamarin.Forms a project with this type is advantageous. Additionally the library supports the Xamarin Native platforms. The choice between Shared and PCL is almost irrelevant. Both options are supported. For the sake of simplicity I’ll use a Shared project. The whole project is now a Xamarin.Forms/Shared project. To reference the library you have to open the NuGet package manager and search for „Mapsui„. Right now I’m using version 1.0.7, which runs stable and reliable. When you are using a different version, please have a look at the changlog. If relevant points have changed, this guide may be not valid any more. Before version 1.0.7 this guide also won’t work. Independent of your project type you should use the latest release of Xamarin.
Custom Renderer
Up to now there is no direct Xamarin.Forms support, so you have to build a custom renderer. You need a wrapper class around the Mapsui component, which can be used in XAML or within the code. The namespaces in this example are the same as in the Xamarin.Forms sample. The sample can be found at the end of this post.
using Mapsui.Styles;

namespace MapsuiFormsSample
{
    public class MapsUIView : Xamarin.Forms.View
    {
        public Mapsui.Map NativeMap { get; }

        protected internal MapsUIView()
        {
            NativeMap = new Mapsui.Map();
            NativeMap.BackColor = Color.Black; //This Color should match the map - I prefer Black over White here
        }
    }
}
With this code we get a Xamarin.Forms compatible control, that has the Mapsui map as a property. In the next step the platform specfic renderers are implemented.
Android Renderer
The platform specific renderer is nothing more than a 1:1 mapping to the native renderer of the Mapsui library. For this we overwrite the „OnElementChanged“ method of our ViewRenderer. Further information regarding the custom renderer can be found in the official Xamarin documentation.
using MapsuiFormsSample;
using MapsuiFormsSample.Droid;
using Xamarin.Forms;
using Xamarin.Forms.Platform.Android;

[assembly: ExportRenderer(typeof(MapsUIView), typeof(MapViewRenderer))]
namespace MapsuiFormsSample.Droid
{
    public class MapViewRenderer : ViewRenderer<MapsUIView, Mapsui.UI.Android.MapControl>
    {
        Mapsui.UI.Android.MapControl mapNativeControl;
        MapsUIView mapViewControl;

        protected override void OnElementChanged(ElementChangedEventArgs<MapsUIView> e)
        {
            base.OnElementChanged(e);

            if (mapViewControl == null && e.NewElement != null)
                mapViewControl = e.NewElement;

            if (mapNativeControl == null && mapViewControl != null)
            {
                mapNativeControl = new Mapsui.UI.Android.MapControl(Context, null);
                mapNativeControl.Map = mapViewControl.NativeMap;

                SetNativeControl(mapNativeControl);
            }
        }
    }
}
iOS Renderer
The iOS renderer is also just a 1:1 mapping like the Android one.
using CoreGraphics;
using Foundation;
using MapsuiFormsSample;
using MapsuiFormsSample.iOS;
using Xamarin.Forms;
using Xamarin.Forms.Platform.iOS;

[assembly: ExportRenderer(typeof(MapsUIView), typeof(MapViewRenderer))]
namespace MapsuiFormsSample.iOS
{
    [Preserve(AllMembers = true)]
    public class MapViewRenderer : ViewRenderer<MapsUIView, Mapsui.UI.iOS.MapControl>
    {
        Mapsui.UI.iOS.MapControl mapNativeControl;
        MapsUIView mapViewControl;

        protected override void OnElementChanged(ElementChangedEventArgs<MapsUIView> e)
        {
            base.OnElementChanged(e);

            if (mapViewControl == null && e.NewElement != null)
                mapViewControl = e.NewElement;

            if (mapNativeControl == null && mapViewControl != null)
            {
                var rectangle = mapViewControl.Bounds;
                var rect = new CGRect(rectangle.X, rectangle.Y, rectangle.Width, rectangle.Height);

                mapNativeControl = new Mapsui.UI.iOS.MapControl(rect);
                mapNativeControl.Map = mapViewControl.NativeMap;
                mapNativeControl.Frame = rect;

                SetNativeControl(mapNativeControl);
            }
        }
    }
}
UWP Renderer
And the last one for UWP. Until now I haven’t tested this one extensively.
using MapsuiFormsSample;
using MapsuiFormsSample.UWP;
using Xamarin.Forms.Platform.UWP;

[assembly: ExportRenderer(typeof(MapsUIView), typeof(MapViewRenderer))]
namespace MapsuiFormsSample.UWP
{
    public class MapViewRenderer : ViewRenderer<MapsUIView, Mapsui.UI.Uwp.MapControl>
    {
        Mapsui.UI.Uwp.MapControl mapNativeControl;
        MapsUIView mapViewControl;

        protected override void OnElementChanged(ElementChangedEventArgs<MapsUIView> e)
        {
            base.OnElementChanged(e);

            if (mapViewControl == null && e.NewElement != null)
                mapViewControl = e.NewElement as MapsUIView;

            if (mapNativeControl == null && mapViewControl != null)
            {
                mapNativeControl = new Mapsui.UI.Uwp.MapControl();
                mapNativeControl.Map = mapViewControl.NativeMap;

                SetNativeControl(mapNativeControl);
            }
        }
    }
}
Map Data, Tiles and Markers
Now the map itself needs to be generated. This can be accomplished in various ways. When the control is only embedded in XAML, it will be the best, if you create the data, tiles and markers within the „MapsUIView“ control. In my opinion this should be cleanest way. Alternatively it is possible to create a container in XAML and add the „MapsUIView“ control in the code behind by using its name. In this case the page of the app can execute the whole generation. The first method has advantages when the same map is used multiple times within the application. The second method has advantages when you want to create multiple but different maps at different pages within the application. The method to use is just a personal matter. However, in this post I will make use of method two.
The XAML code looks like this:
<?xml version="1.0" encoding="utf-8" ?>
<ContentPage xmlns="http://xamarin.com/schemas/2014/forms"
             xmlns:x="http://schemas.microsoft.com/winfx/2009/xaml"
             x:Class="MapsuiFormsSample.MainPage">

    <ContentPage.Content>
        <Grid x:Name="ContentGrid" />
    </ContentPage.Content>
</ContentPage>
The map can now be added to the „ContentGrid“ with the code behind. The Mainpage.xaml.cs looks like this:
using System.Diagnostics;
using Mapsui.Geometries;
using Mapsui.Layers;
using Mapsui.Providers;
using Mapsui.Styles;
using Mapsui.Utilities;

namespace MapsuiFormsSample
{
	public partial class MainPage
	{
		public MainPage()
		{
			InitializeComponent();

			var mapControl = new MapsUIView();
			mapControl.NativeMap.Layers.Add(OpenStreetMap.CreateTileLayer());

			var layer = GenerateIconLayer();
			mapControl.NativeMap.Layers.Add(layer);
			mapControl.NativeMap.InfoLayers.Add(layer);

			mapControl.NativeMap.Info += (sender, args) =>
				{
	                		var layername = args.Layer?.Name;
	                		var featureLabel = args.Feature?["Label"]?.ToString();
	                		var featureType = args.Feature?["Type"]?.ToString();

	                		Debug.WriteLine("Info Event was invoked.");
	                		Debug.WriteLine("Layername: " + layername);
	                		Debug.WriteLine("Feature Label: " + featureLabel);
	                		Debug.WriteLine("Feature Type: " + featureType);

	                		Debug.WriteLine("World Postion: {0:F4} , {1:F4}", args.WorldPosition?.X, args.WorldPosition?.Y);
	                		Debug.WriteLine("Screen Postion: {0:F4} , {1:F4}", args.ScreenPosition?.X, args.ScreenPosition?.Y);
	            		};

	        	ContentGrid.Children.Add(mapControl);
	    	}

	    	private ILayer GenerateIconLayer()
	    	{
	        	var layername = "My Local Layer";
	        	return new Layer(layername)
	            		{
	                		Name = layername,
	                		DataSource = new MemoryProvider(GetIconFeatures()),
                   			Style = new SymbolStyle
	                    			{
	                        			SymbolScale = 0.8,
	                        			Fill = new Brush(Color.Red),
	                        			Outline = { Color = Color.Black, Width = 1 }
	                    			}
                		};
	    	}

	    	private Features GetIconFeatures()
	    	{
	        	var features = new Features();
	        	var feature = new Feature
	        		{
	            			Geometry = new Polygon(new LinearRing(new[]
	            				{
	                				new Point(1066689.6851, 6892508.8652),
	                				new Point(1005540.0624, 6987290.7802),
	                				new Point(1107659.9322, 7056389.8538),
	                				new Point(1066689.6851, 6892508.8652)
	            				})),
	            			["Label"] = "My Feature Label",
	            			["Type"] = "My Feature Type"
	        		};

	        	features.Add(feature);
	        	return features;
		}
	}
}
So what exactly happend? The creation of the new instance in line 15 should be obvious. However, in line 16 we already have something specific for Mapsui. The map tiles of the Mapsui map property (NativeMap) are added to the first layer. If you want to use your own map tiles, you will have to provide your own *.mbtiles database. You can find some samples in the Github repository. Additionally an „icon“-layer is created. This layer is added to the map tiles layers and the info layers. The latter ones are required, in order to react to touch events.
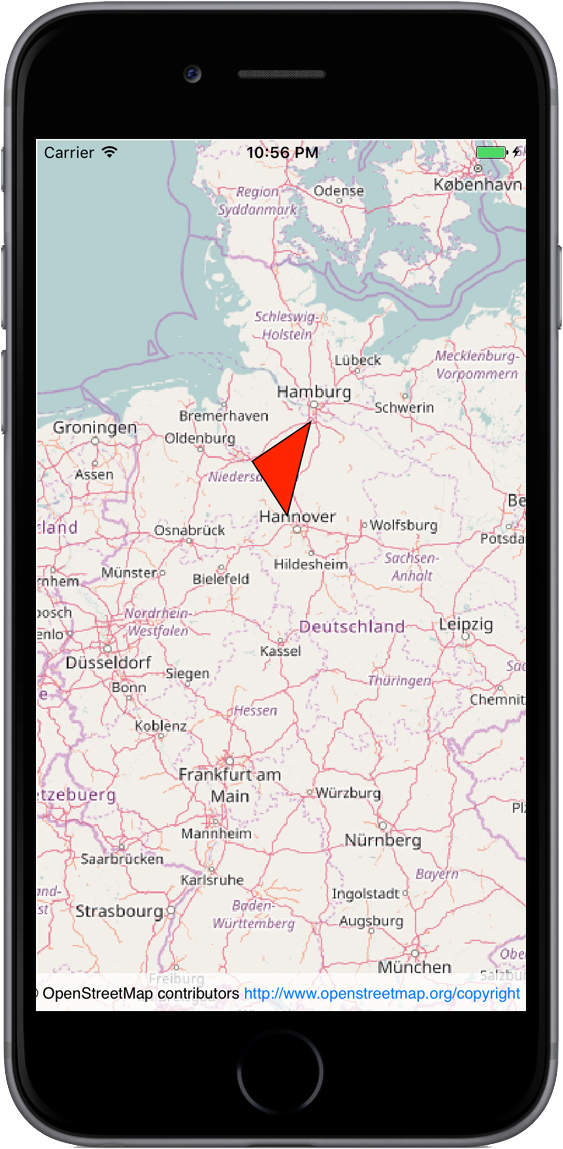
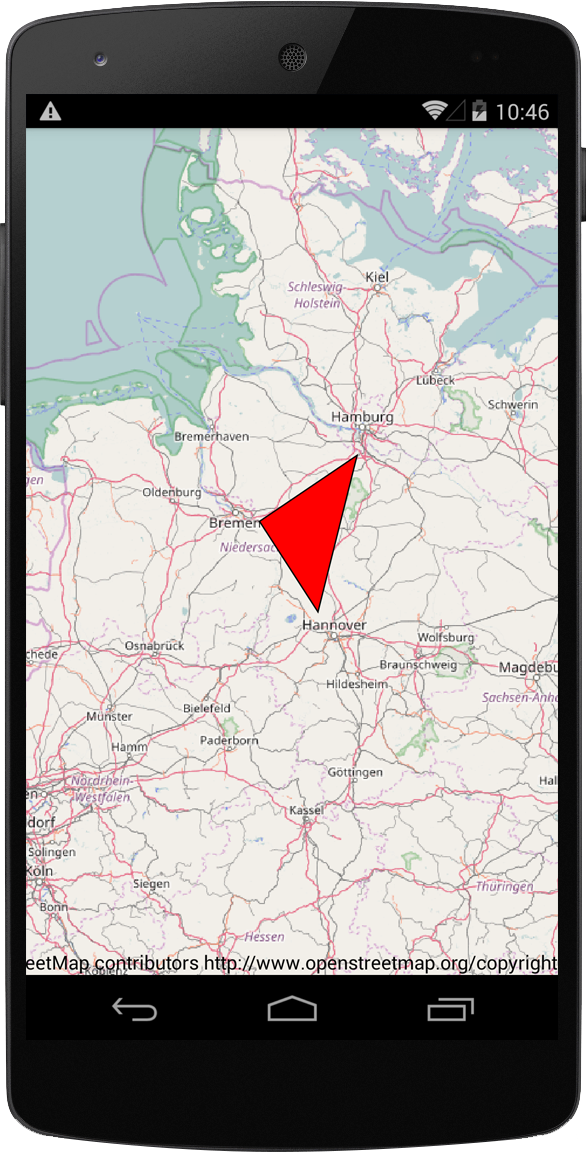
The result
The time for results has come. In the end we will see a red triangle between Hannover, Bremen and Hamburg, that was created within the code:

When questions arise you can post them in the comment section. Errors with Mapsui have to be submitted as an issue in Github.
My Apps with Mapsui


Sample code
Here you can find the source code of this post: Download sourcecode.
Advertising
You like this post and you want to support me? Share this page in social media networks, check out the amazon links or use PayPal. Every bit of support is great for websites like this.